Usually, Elgato Thunderbolt™ 2 Dock will establish an Ethernet connection as soon as you plug it into the Thunderbolt port on your Mac.
However, in some circumstances, the Ethernet connection may not be established at first.
In that case, your computer may not receive a DHCP address, or may not show any connection to the Elgato Thunderbolt™ 2 Dock in the Network section of the System Preferences.
To resolve this problem, please try the following steps.
Create New Location
1) Connect the Elgato Thunderbolt™ 2 Dock to the Mac.
2) Connect the Ethernet cable to the port on the Elgato Thunderbolt™ 2 Dock.
3) Go to the Apple menu, and choose System Preferences....
4) Select the Network section
5) Select "Edit Locations…" from the Locations menu:
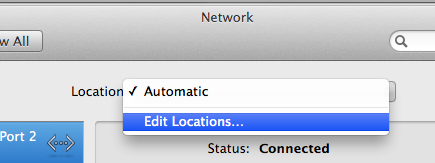
6) Add a new Location, name it as you please, and then click Done
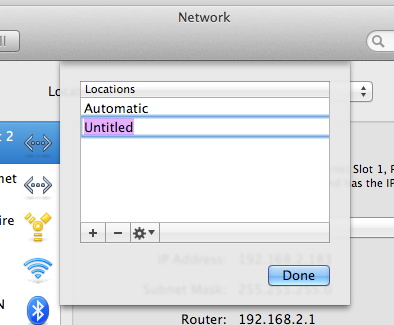
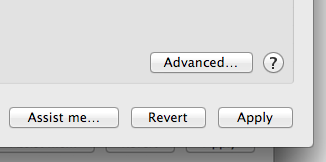
7) Click the Apply button at the lower right edge of the Network preference pane:
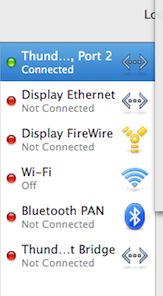
8) At this point, all the possible network interfaces that exist on your Mac are visible, including the Ethernet port of the Elgato Thunderbolt™ 2 Dock, which is labeled "Thunderbolt Ethernet Slot", along with a number
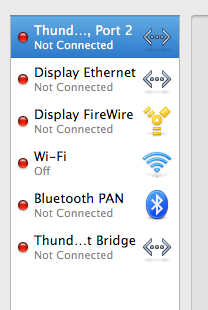
9) You may need to wait for up to 20 seconds before the red indicator to the left of "Thunderbolt Ethernet Slot 1, Port 2" changes to green.
Adjust Duplex Option
If adding a new Location doesn't help, you can try these steps:
1) Unplug the Ethernet cable from your Elgato Thunderbolt™ 2 Dock
2) Go to the Apple menu, and choose System Preferences....
3) Select the Network section
4) Select the Thunderbolt Ethernet Slot associated with the Elgato Thunderbolt™ 2 Dock
5) Press the "Advanced..." button, then press the "Hardware" tab.
6) Set Configure to "Manual", and select the speed of your router, like 100BaseTX
7) For Duplex, choose "full-duplex" only. Do not choose the "energy-efficient-ethernet" option. Keep the MTU setting as the default, like Standard (1500)
8) Press the "OK" button.
9) Press the "Apply" button.
10) Plug in the Ethernet cable into Elgato Thunderbolt™ 2 Dock
However, in some circumstances, the Ethernet connection may not be established at first.
In that case, your computer may not receive a DHCP address, or may not show any connection to the Elgato Thunderbolt™ 2 Dock in the Network section of the System Preferences.
To resolve this problem, please try the following steps.
Create New Location
1) Connect the Elgato Thunderbolt™ 2 Dock to the Mac.
2) Connect the Ethernet cable to the port on the Elgato Thunderbolt™ 2 Dock.
3) Go to the Apple menu, and choose System Preferences....
4) Select the Network section
5) Select "Edit Locations…" from the Locations menu:
6) Add a new Location, name it as you please, and then click Done
7) Click the Apply button at the lower right edge of the Network preference pane:
8) At this point, all the possible network interfaces that exist on your Mac are visible, including the Ethernet port of the Elgato Thunderbolt™ 2 Dock, which is labeled "Thunderbolt Ethernet Slot", along with a number
9) You may need to wait for up to 20 seconds before the red indicator to the left of "Thunderbolt Ethernet Slot 1, Port 2" changes to green.
Adjust Duplex Option
If adding a new Location doesn't help, you can try these steps:
1) Unplug the Ethernet cable from your Elgato Thunderbolt™ 2 Dock
2) Go to the Apple menu, and choose System Preferences....
3) Select the Network section
4) Select the Thunderbolt Ethernet Slot associated with the Elgato Thunderbolt™ 2 Dock
5) Press the "Advanced..." button, then press the "Hardware" tab.
6) Set Configure to "Manual", and select the speed of your router, like 100BaseTX
7) For Duplex, choose "full-duplex" only. Do not choose the "energy-efficient-ethernet" option. Keep the MTU setting as the default, like Standard (1500)
8) Press the "OK" button.
9) Press the "Apply" button.
10) Plug in the Ethernet cable into Elgato Thunderbolt™ 2 Dock