There are a few things that need be mentioned up front when it comes to PC Game Recording with Elgato Gaming products.
Please note that Elgato Gaming products are designed to capture from Gaming Consoles and not every PC setup will work.
If you play and record from the same PC, it is likely you will run into some performance related issues. Your computer does not only have to deal with the game that you currently play, but also take care of the recording and processing of that video at the same time. The result might be that your processor will run into a high work load, which might cause issues with the recordings.
These issues could be screen tearing, audio distortion, or other graphical errors that might end up in the recording.
That is why the System Requirements only apply to capturing from a console, unless you have a second PC, which fulfills the System Requirements and can be used to record the Gaming PC.
Recording and Playing on the Same PC
If you plan on playing and recording on the same PC, please make sure to use the correct setup.
For the purposes of this article, we will use a Windows 10 PC as an example.
For the setup, you will need a graphics card that is seated within your gaming PC, this will be most likely an AMD, or Nvidia graphics card. The HDMI out on your graphics card will be used to connect to the HDMI input of Elgato Game Capture 4K60 Pro with the provided HDMI cable.
1) Install the Elgato 4K Capture Utility:
https://gc-updates.elgato.com/windows/spotlight-update/1.0.0/final/download-x64.php
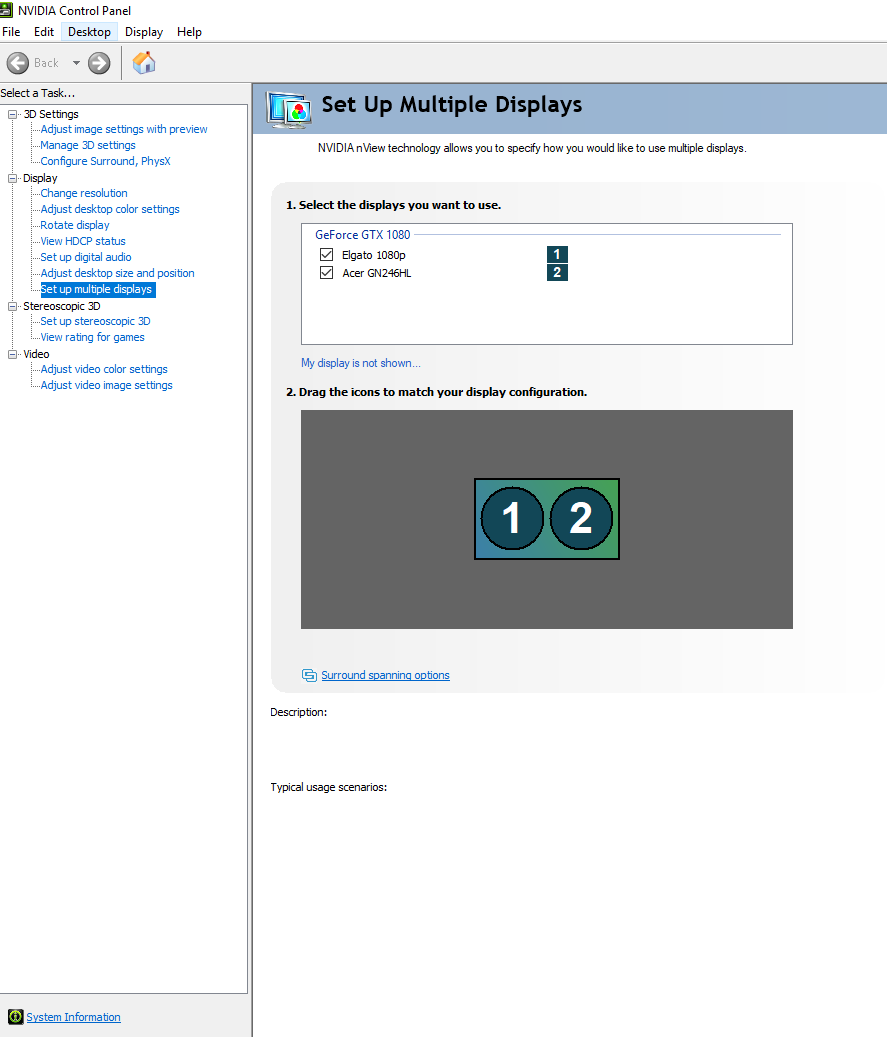
2) Make sure to clone your Display via the Windows Display settings, or via the Nvidia Control Panel / AMD Catalyst Control Center (below is a screenshot from the Nvidia Control Panel).
3) Open up the Elgato 4K Capture Utility, and make changes to your settings that best fit your setup (see screenshot below):
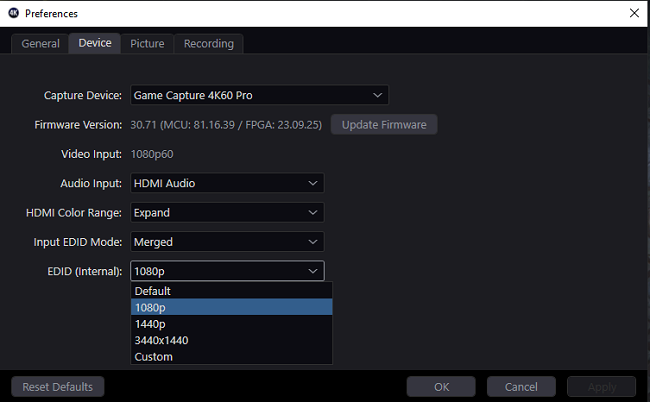
You can change the EDID accordingly, depending on which resolution you use. In this case it was a 1080p Display.
If you see pictures that duplicate themselves inside the Elgato 4K Capture Utility, then the setup is correct.
How to Record Sound via Elgato Sound Capture
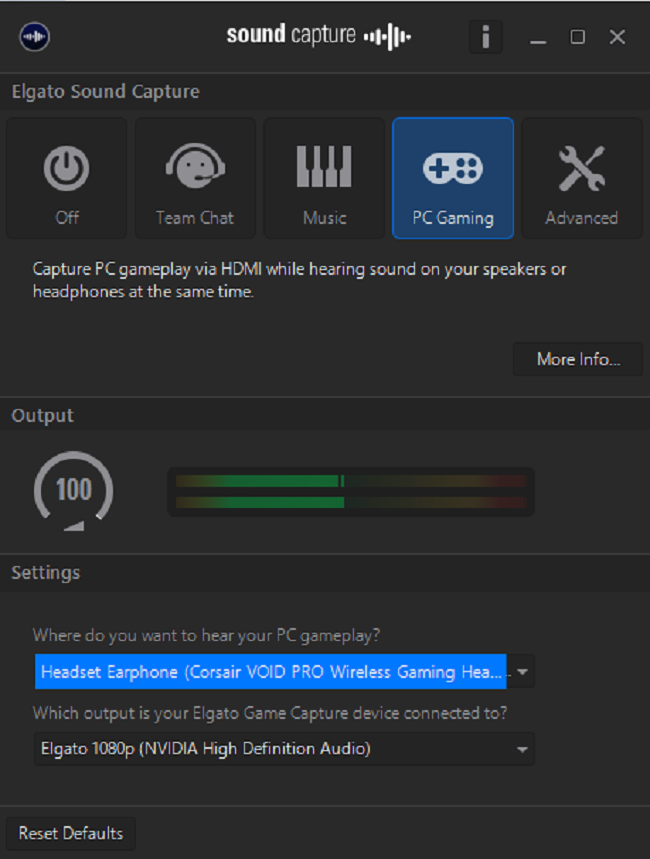
Elgato Sound Capture is the easiest way and most likely preferred way to capture audio. In this setup, you simply open Elgato Sound Capture and chose the "PC Gaming" feature, which lets you chose not only how the audio gets submitted, but also where you want to hear your audio.
In this case, you could send the audio via HDMI to your Elgato Gaming device and simultaneously hear the sound on your headset on the Gaming computer.
Here is a screenshot of how the settings could look for you, this might be different depending on what Audio devices you are using.
Once everything is set up correctly you should be able to see the Game Audio widget within Elgato 4K Capture Utility moving, once a game is played, or any sound that is played coming over the HDMI Out of your graphics card.
Elgato Sound Capture is part of the Elgato Game Capture HD software, so you will have to install the whole software, in order to be able to use it. You can download it here:
Elgato Game Capture HD Software (Windows)
This should complete the setup. Please keep in mind that with this setup your Elgato 4K Capture Utility will be running in the background and you have to use ALT + Tab to switch around between the actual game and Elgato 4K Capture Utility. This means starting and stopping a recording will require ALT + Tab so you can switch between the two.
Recording from One PC to Another PC
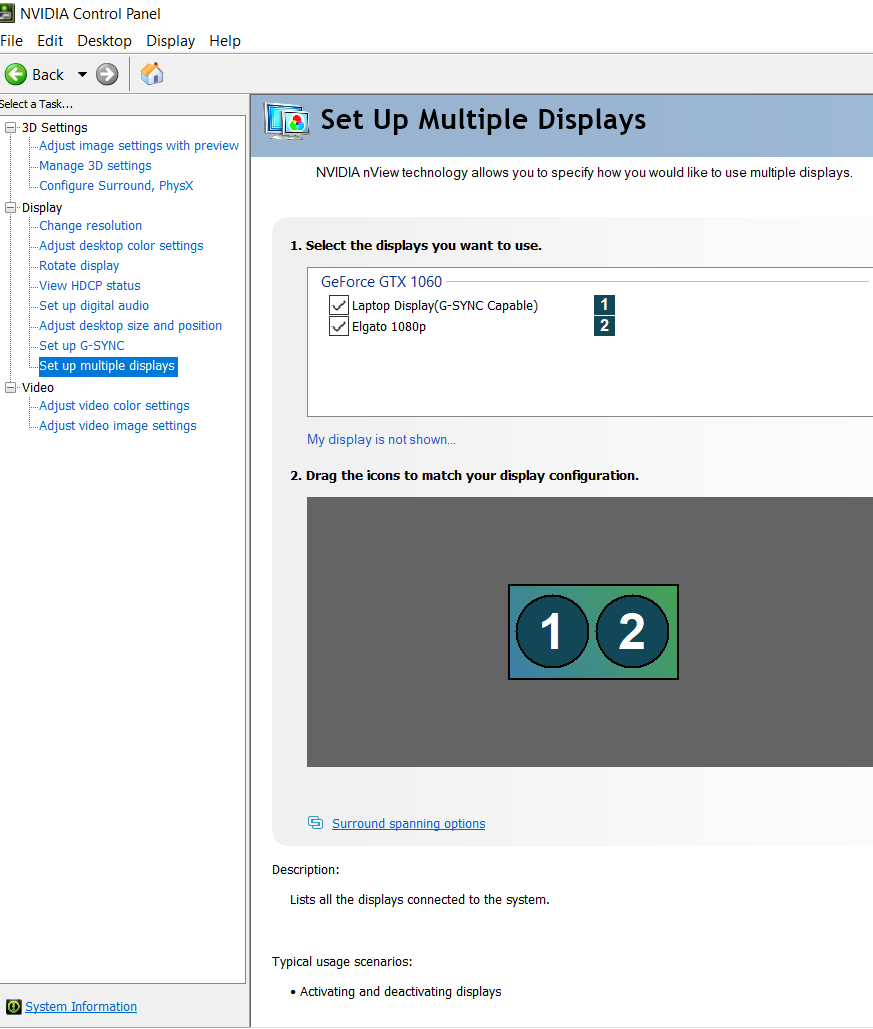
Recording your Gaming PC using another separate computer that fulfills the System Requirements is the best choice. In this case, we’re capturing a Gaming Laptop using a Desktop PC with a Elgato Game Capture 4K60 Pro.
In any case, you connect the HDMI Out of your graphics card to the HDMI In of your Elgato Game Capture 4K60 Pro. You can clone/duplicate the monitor as described earlier to make sure everything works as expected.
You can find the screenshot for the setup we've used below:
Elgato Sound Capture is the easiest way and most likely preferred way to capture the audio. In this setup, which includes Elgato Sound Capture (install Elgato Game Capture HD software also on your Gaming computer), you simply open Elgato Sound Capture and chose the "PC Gaming" feature, which lets you chose not only how the audio gets submitted, as well as where you want to hear your audio.
In this case, you could send the audio via HDMI to your Elgato Gaming device and simultaneously hear the sound on your speakers or headset on the Gaming computer. Please see the screenshot below for more info:
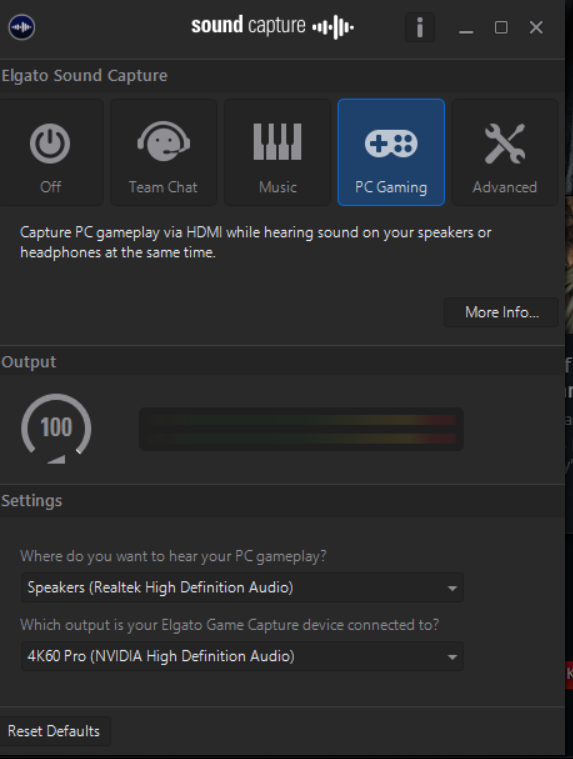
Please Note: On the Streaming/Recording PC you typically would turn Elgato Sound Capture to the "OFF" position and use the default Windows Audio Playback device assigned to that computer (in most cases Realtek High Definition Audio).
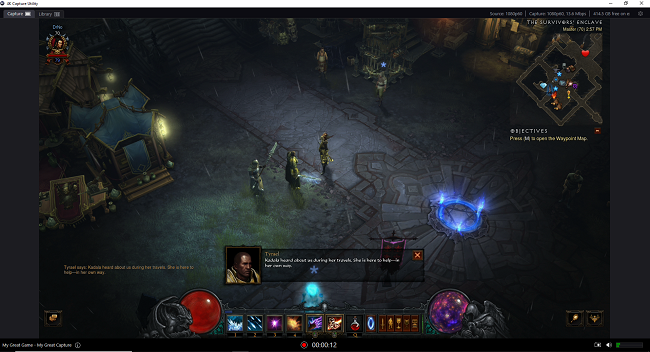
Please see the screenshot below of a recording in action with the Elgato 4K Capture Utility.
If you should still have issues or questions, please open a support ticket to us, so we can assist you in this matter.
Please note that Elgato Gaming products are designed to capture from Gaming Consoles and not every PC setup will work.
If you play and record from the same PC, it is likely you will run into some performance related issues. Your computer does not only have to deal with the game that you currently play, but also take care of the recording and processing of that video at the same time. The result might be that your processor will run into a high work load, which might cause issues with the recordings.
These issues could be screen tearing, audio distortion, or other graphical errors that might end up in the recording.
That is why the System Requirements only apply to capturing from a console, unless you have a second PC, which fulfills the System Requirements and can be used to record the Gaming PC.
Recording and Playing on the Same PC
If you plan on playing and recording on the same PC, please make sure to use the correct setup.
For the purposes of this article, we will use a Windows 10 PC as an example.
For the setup, you will need a graphics card that is seated within your gaming PC, this will be most likely an AMD, or Nvidia graphics card. The HDMI out on your graphics card will be used to connect to the HDMI input of Elgato Game Capture 4K60 Pro with the provided HDMI cable.
1) Install the Elgato 4K Capture Utility:
https://gc-updates.elgato.com/windows/spotlight-update/1.0.0/final/download-x64.php
2) Make sure to clone your Display via the Windows Display settings, or via the Nvidia Control Panel / AMD Catalyst Control Center (below is a screenshot from the Nvidia Control Panel).
You can change the EDID accordingly, depending on which resolution you use. In this case it was a 1080p Display.
If you see pictures that duplicate themselves inside the Elgato 4K Capture Utility, then the setup is correct.
How to Record Sound via Elgato Sound Capture
Elgato Sound Capture is the easiest way and most likely preferred way to capture audio. In this setup, you simply open Elgato Sound Capture and chose the "PC Gaming" feature, which lets you chose not only how the audio gets submitted, but also where you want to hear your audio.
In this case, you could send the audio via HDMI to your Elgato Gaming device and simultaneously hear the sound on your headset on the Gaming computer.
Here is a screenshot of how the settings could look for you, this might be different depending on what Audio devices you are using.
Once everything is set up correctly you should be able to see the Game Audio widget within Elgato 4K Capture Utility moving, once a game is played, or any sound that is played coming over the HDMI Out of your graphics card.
Elgato Sound Capture is part of the Elgato Game Capture HD software, so you will have to install the whole software, in order to be able to use it. You can download it here:
Elgato Game Capture HD Software (Windows)
This should complete the setup. Please keep in mind that with this setup your Elgato 4K Capture Utility will be running in the background and you have to use ALT + Tab to switch around between the actual game and Elgato 4K Capture Utility. This means starting and stopping a recording will require ALT + Tab so you can switch between the two.
Recording from One PC to Another PC
Recording your Gaming PC using another separate computer that fulfills the System Requirements is the best choice. In this case, we’re capturing a Gaming Laptop using a Desktop PC with a Elgato Game Capture 4K60 Pro.
In any case, you connect the HDMI Out of your graphics card to the HDMI In of your Elgato Game Capture 4K60 Pro. You can clone/duplicate the monitor as described earlier to make sure everything works as expected.
You can find the screenshot for the setup we've used below:
Elgato Sound Capture is the easiest way and most likely preferred way to capture the audio. In this setup, which includes Elgato Sound Capture (install Elgato Game Capture HD software also on your Gaming computer), you simply open Elgato Sound Capture and chose the "PC Gaming" feature, which lets you chose not only how the audio gets submitted, as well as where you want to hear your audio.
In this case, you could send the audio via HDMI to your Elgato Gaming device and simultaneously hear the sound on your speakers or headset on the Gaming computer. Please see the screenshot below for more info:
Please see the screenshot below of a recording in action with the Elgato 4K Capture Utility.
To learn more about the Elgato 4K Capture Utility and how it works, please visit the Link below:
Elgato 4K Capture Utility - User Interface
Elgato 4K Capture Utility - User Interface
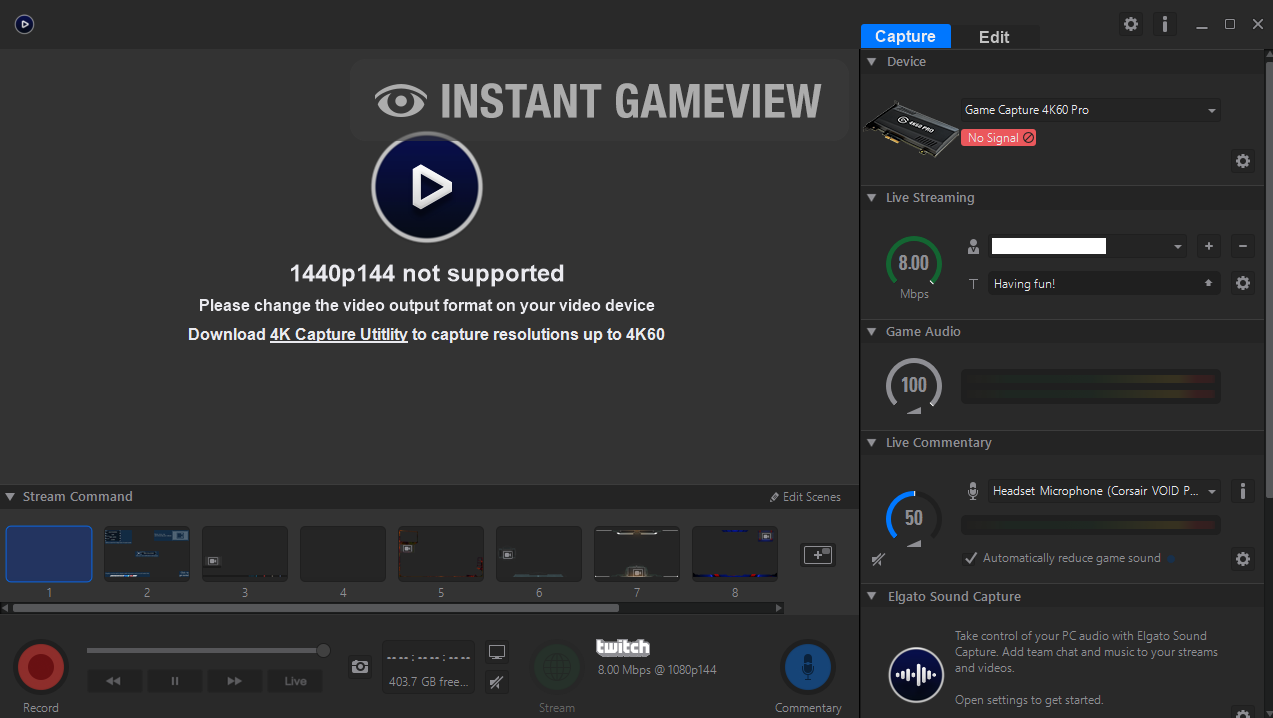
Please note: You can even use the Elgato Game Capture HD software with Elgato Game Capture 4K60 Pro. Please keep in mind that it only works up to 1080p60, therefore you need to set your Graphics Card resolution to 1920 x 1080 x 60 Hertz in order for the picture to be displayed. Any resolution/Hertz above, will result in a "No Signal" message (Example below).
If you should still have issues or questions, please open a support ticket to us, so we can assist you in this matter.