Elgato Game Capture HD software version 2.0 adds the ability to overlay webcam video and still graphics on top of your gameplay, while you are streaming.
This new feature is called Stream Command.
Stream Command System Requirements
To use Stream Command, you will need a powerful computer:
2nd generation Intel Core i7 CPU (i7-2xxx or comparable), 2 Ghz or higher, before Turbo Boost
4GB RAM (or higher)
If you are using the Elgato Game Capture HD60 S, then the requirements are higher. The minimum System Requirements for that product will be able to use Stream Command:
Elgato Game Capture HD60 S System Requirements
A processor with a suffix like "U" (Ultra-low voltage) or "M" is not always recommended, since it will have significantly lower performance. They might seem to be powerful, but the U or M suffix indicates that they have much lower performance than other processors in that family or generation.
Stream Command Software Download
Version 2.0 and above of Elgato Game Capture HD for Windows contains Stream Command. You can download that software from here:
Download Elgato Game Capture HD Windows Software
The Mac version of Stream Command is now available in macOS software, which you can download here:
Download Elgato Game Capture HD Mac Software
The macOS version of Stream Command does not have the same features as the Windows version. Please see this article to find out more about the differences:
Stream Command - Differences Between Windows and macOS
Windows - Turning Stream Command On or Off
The control to turn on Stream Command is in the Preferences.
Go to the Capture tab, and check the "Enable Stream Command" option.
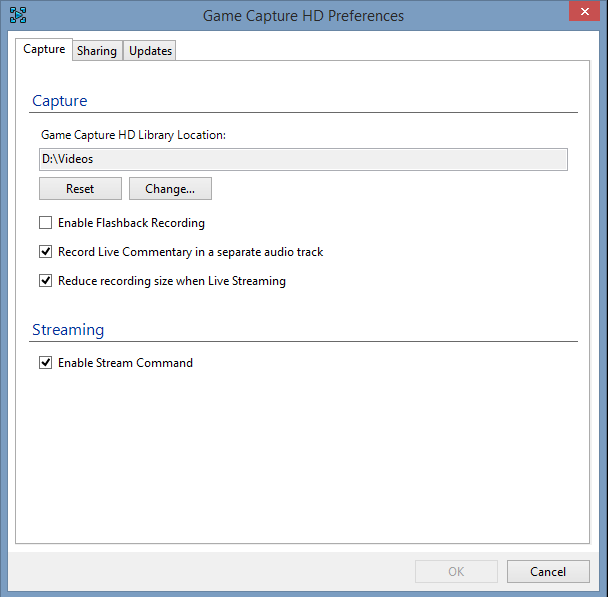
Please Note:
When Stream Command is on, then you can use Image and Webcam overlays, along with the gameplay video stream.
When Stream Command is off, you can still stream gameplay video, but without the use of Image or Webcam overlays.
Windows - Video Encoding and Stream Command
If Stream Command is turned on, then software transcoding will be used. That will take up more resources than if you stream with Stream Command turned off.
When Stream Command is turned off in the Preferences, then hardware transcoding will be active. That will use less resources.
Version 2.1 of Elgato Game Capture HD for Windows contains Hardware Accelerated Encoding options that can be used for Stream Command.
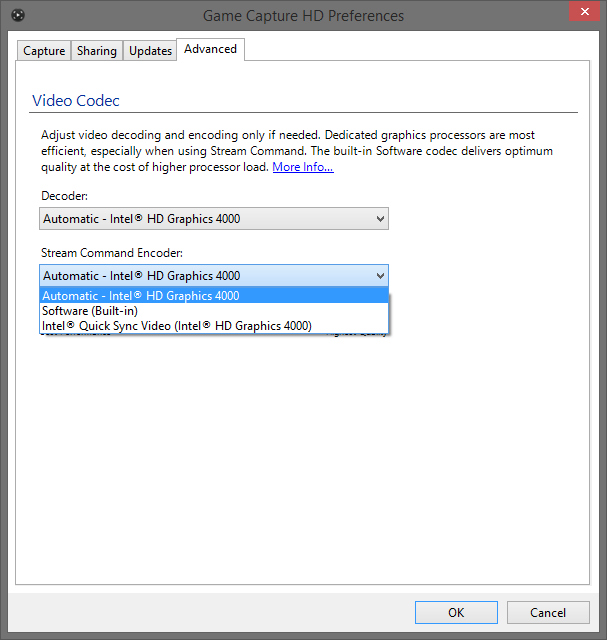
Please see this article for more information:
Elgato Game Capture HD and Hardware Accelerated Decoding and Encoding
OS X - Turning Stream Command On or Off
The control to turn on Stream Command is in the Preferences.
Go to the Capture tab, and check the "Enable Stream Command" option.
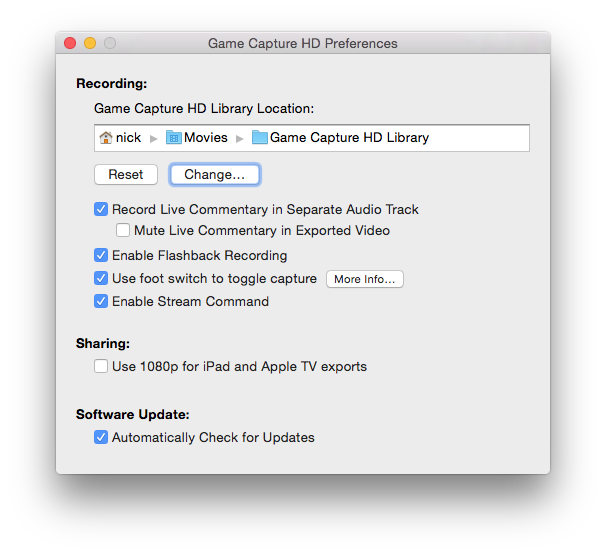
If Stream Command is turned on, then software transcoding will be used. That will take up more resources than if you stream with Stream Command turned off.
When Stream Command is turned off in the Preferences, then hardware transcoding will be active. That will use less resources.
General Information
Stream Command works by using separate Scenes.
Each Scene can have an unique layout, where a Webcam and/or Images are placed at various locations over your video.
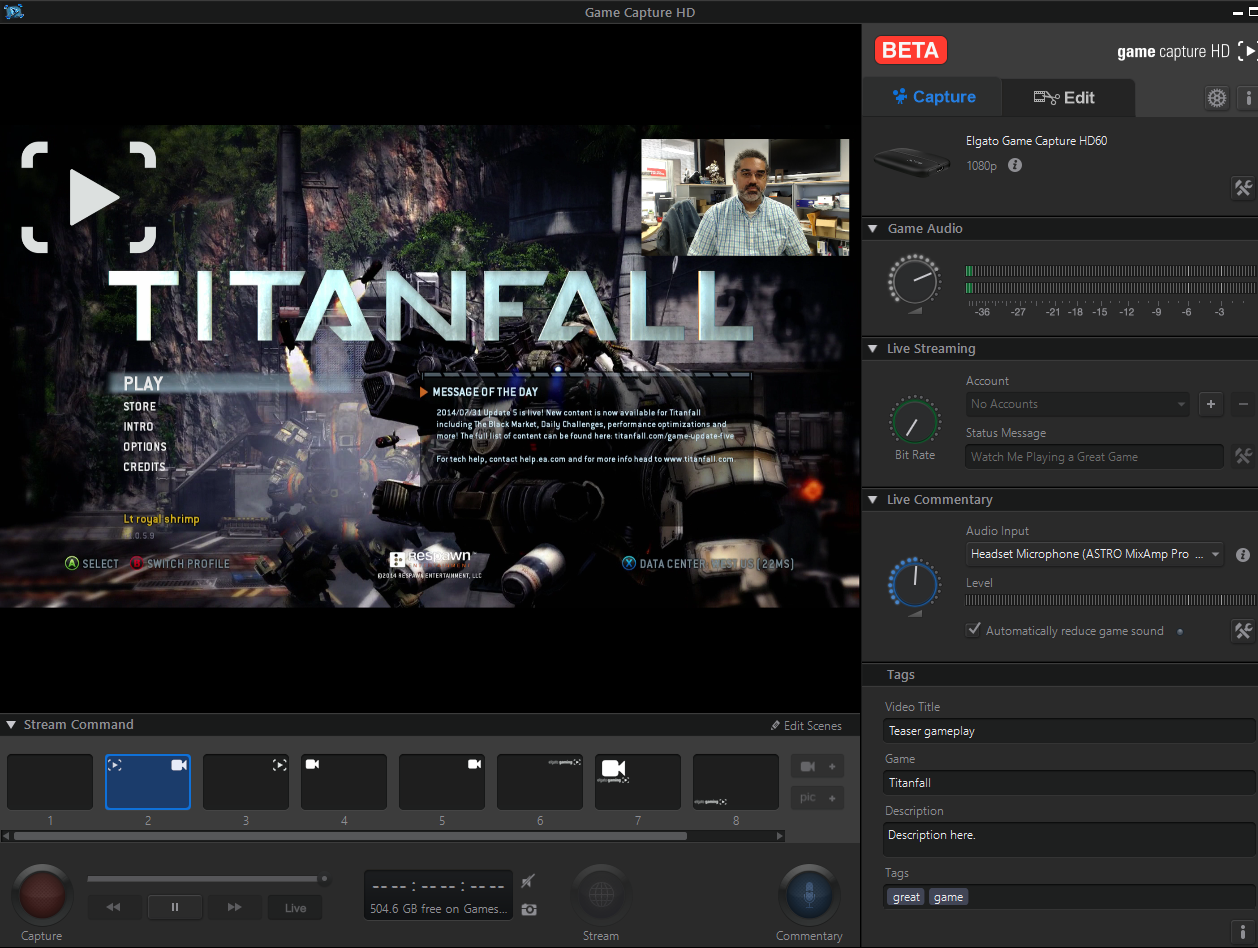
There are a total of 9 Scenes that you can use. Each one is numbered from 1 to 9.
To layout a Scene, first select it in the Stream Command section of Elgato Game Capture HD. That section is directly above the red Capture button.
You can toggle the Stream Command section to show or hide by clicking on the disclosure triangle.
In the screenshot below, the first scene is selected, with a blue highlight.

Edit Scenes
After you highlight a Scene, you can use the Edit Scenes button to change it.
Below the Edit Scenes option, there are two buttons.

One is to add a Webcam - it looks like a camera, along with a "+" sign.

The other one is to add an image - it says "pic +".

Add Webcam
First, highlight the numbered scene you want to use.

Then, press Edit Scenes. That button will change to Save Scenes.

Press the first button under the Save Scenes option to add a Webcam.

A dialog will appear asking you to select your Webcam from all internal or external cameras your computer has access to.
Then, a rectangle will appear on screen - your Webcam image will appear in that rectangle.
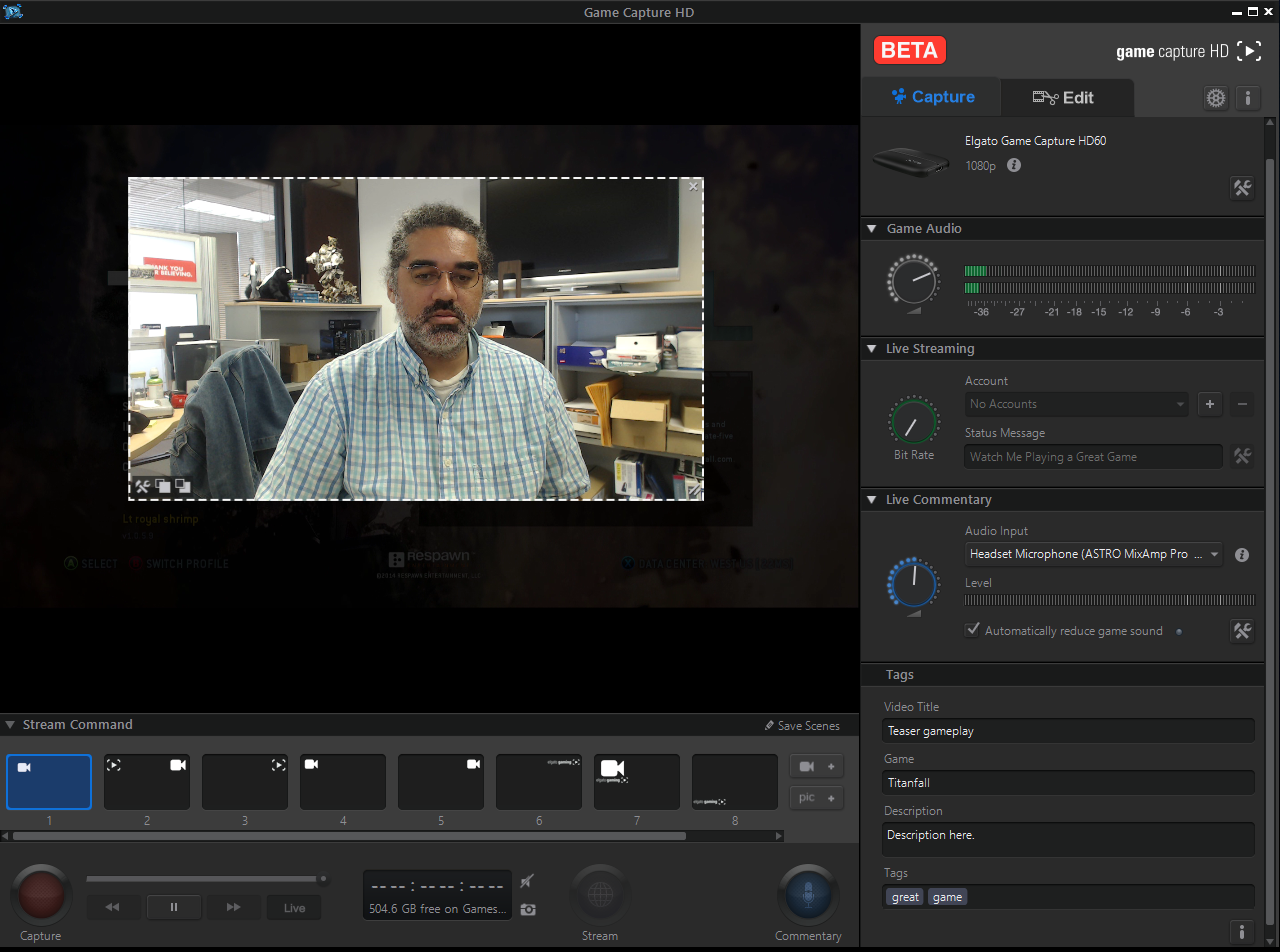
You can move it to the location you prefer. You can also resize it by grabbing a corner and dragging.
At the bottom left corner of the Webcam window there are three buttons.

The first button looks like a hammer and wrench. That button brings up the Webcam settings window.
The second button brings that Webcam window to the front layer, so it will float over other elements you've placed.
The third button puts that Webcam window into a lower layer, so it will appear underneath other elements you've placed.
At the top right corner of the Webcam there is an "X", which can be used to remove the Webcam window from the Scene.

Press Save Scenes to save your changes.
Add Image
First, highlight the numbered scene you want to use.

The, press Edit Scenes. That button will change to Save Scenes.

Then, press the second button under the Save Scenes option option to add a Image.

A dialog will appear asking you to select an image to use.
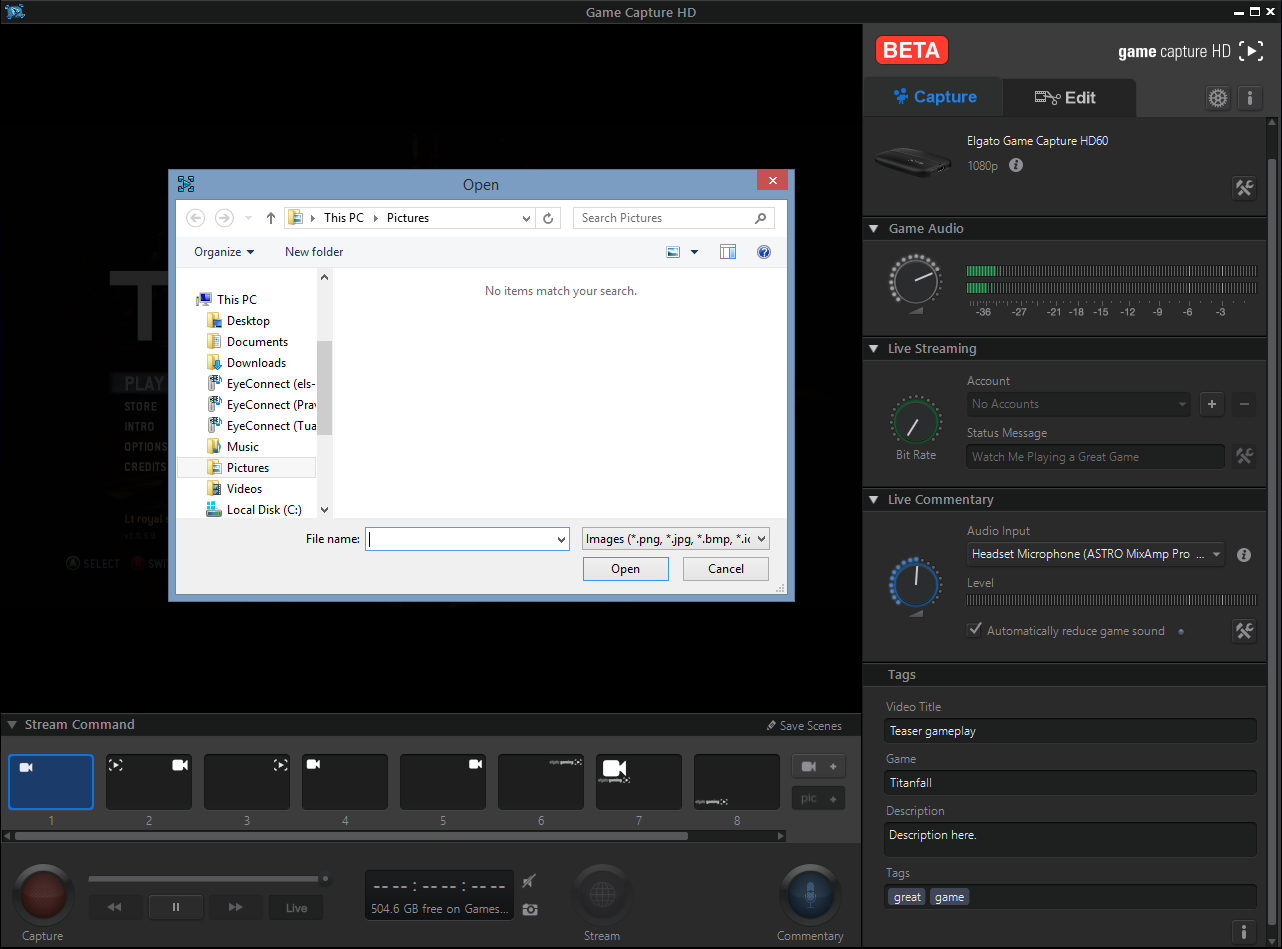
Then, a rectangle will appear on screen - your image will appear in that rectangle.
You can move it to the location you prefer. You can also resize it by grabbing a corner and dragging.
At the bottom left corner of the Image window there are two buttons.

The first button brings that Image window to the front layer, so it will float over other elements you've placed.
The second button puts that Image window into a lower layer, so it will appear underneath other elements you've placed.
At the top right corner of the Image there is an "X", which can be used to remove the Webcam window from the Scene.
Press Save Scenes to save your changes.
Default Scene Presets
Scenes numbers 2 through 9 include preset locations for the Webcam and Images.
If you want to clear a Scene, highlight it and then Right-Click, selecting "Remove All Overlays".
If you want to bring the default preset for a Scene back, highlight it and then Right-Click, selecting "Reset to Default".
Stream Command Scenes Only Appear Sometimes
The Scenes you make for use with Stream Command will appear to viewers of your stream.
They will not appear in any recordings or shared files you make from that stream.
Scenes will appear in any screenshots you take of your stream.
To preview your Scenes, set the incoming video to Live. If you view video in the Flashback Recording buffer, then the Scenes will not be visible.
Saving Webcam Video Separately
If you create a Scene with Webcam (Facecam) video, and record it, you can later save that Webcam video as a separate video file.
To do this, Right-Click on the video timeline in the Edit section, and then select "Save Webcam Video Only".
You can also choose the "Export webcam to a separate video file" option in the Sharing section of the Preferences. Then, that process will happen each time you share a recording.
Special Shortcut Keys
Press numbers 1 through 9 on the keyboard to switch from one Scene to another.
Press the Esc key to leave the Edit Scenes mode.
Hold down the Shift key to freely resize your Scene elements without being constrained by the normal aspect ratio.
This new feature is called Stream Command.
Stream Command System Requirements
To use Stream Command, you will need a powerful computer:
2nd generation Intel Core i7 CPU (i7-2xxx or comparable), 2 Ghz or higher, before Turbo Boost
4GB RAM (or higher)
If you are using the Elgato Game Capture HD60 S, then the requirements are higher. The minimum System Requirements for that product will be able to use Stream Command:
Elgato Game Capture HD60 S System Requirements
A processor with a suffix like "U" (Ultra-low voltage) or "M" is not always recommended, since it will have significantly lower performance. They might seem to be powerful, but the U or M suffix indicates that they have much lower performance than other processors in that family or generation.
Stream Command Software Download
Version 2.0 and above of Elgato Game Capture HD for Windows contains Stream Command. You can download that software from here:
Download Elgato Game Capture HD Windows Software
The Mac version of Stream Command is now available in macOS software, which you can download here:
Download Elgato Game Capture HD Mac Software
The macOS version of Stream Command does not have the same features as the Windows version. Please see this article to find out more about the differences:
Stream Command - Differences Between Windows and macOS
Windows - Turning Stream Command On or Off
The control to turn on Stream Command is in the Preferences.
Go to the Capture tab, and check the "Enable Stream Command" option.
Please Note:
When Stream Command is on, then you can use Image and Webcam overlays, along with the gameplay video stream.
When Stream Command is off, you can still stream gameplay video, but without the use of Image or Webcam overlays.
Windows - Video Encoding and Stream Command
If Stream Command is turned on, then software transcoding will be used. That will take up more resources than if you stream with Stream Command turned off.
When Stream Command is turned off in the Preferences, then hardware transcoding will be active. That will use less resources.
Version 2.1 of Elgato Game Capture HD for Windows contains Hardware Accelerated Encoding options that can be used for Stream Command.
Please see this article for more information:
Elgato Game Capture HD and Hardware Accelerated Decoding and Encoding
OS X - Turning Stream Command On or Off
The control to turn on Stream Command is in the Preferences.
Go to the Capture tab, and check the "Enable Stream Command" option.
If Stream Command is turned on, then software transcoding will be used. That will take up more resources than if you stream with Stream Command turned off.
When Stream Command is turned off in the Preferences, then hardware transcoding will be active. That will use less resources.
General Information
Stream Command works by using separate Scenes.
Each Scene can have an unique layout, where a Webcam and/or Images are placed at various locations over your video.
There are a total of 9 Scenes that you can use. Each one is numbered from 1 to 9.
To layout a Scene, first select it in the Stream Command section of Elgato Game Capture HD. That section is directly above the red Capture button.
You can toggle the Stream Command section to show or hide by clicking on the disclosure triangle.
In the screenshot below, the first scene is selected, with a blue highlight.
Edit Scenes
After you highlight a Scene, you can use the Edit Scenes button to change it.
Below the Edit Scenes option, there are two buttons.
One is to add a Webcam - it looks like a camera, along with a "+" sign.
The other one is to add an image - it says "pic +".
You can only edit Scenes if Elgato Game Capture hardware is connected to your computer.
Add Webcam
First, highlight the numbered scene you want to use.
Then, press Edit Scenes. That button will change to Save Scenes.
Press the first button under the Save Scenes option to add a Webcam.
A dialog will appear asking you to select your Webcam from all internal or external cameras your computer has access to.
Then, a rectangle will appear on screen - your Webcam image will appear in that rectangle.
You can move it to the location you prefer. You can also resize it by grabbing a corner and dragging.
At the bottom left corner of the Webcam window there are three buttons.
The first button looks like a hammer and wrench. That button brings up the Webcam settings window.
The second button brings that Webcam window to the front layer, so it will float over other elements you've placed.
The third button puts that Webcam window into a lower layer, so it will appear underneath other elements you've placed.
At the top right corner of the Webcam there is an "X", which can be used to remove the Webcam window from the Scene.
Press Save Scenes to save your changes.
Add Image
First, highlight the numbered scene you want to use.
The, press Edit Scenes. That button will change to Save Scenes.
A dialog will appear asking you to select an image to use.
Then, a rectangle will appear on screen - your image will appear in that rectangle.
You can move it to the location you prefer. You can also resize it by grabbing a corner and dragging.
At the bottom left corner of the Image window there are two buttons.
The first button brings that Image window to the front layer, so it will float over other elements you've placed.
The second button puts that Image window into a lower layer, so it will appear underneath other elements you've placed.
At the top right corner of the Image there is an "X", which can be used to remove the Webcam window from the Scene.
Press Save Scenes to save your changes.
Default Scene Presets
Scenes numbers 2 through 9 include preset locations for the Webcam and Images.
If you want to clear a Scene, highlight it and then Right-Click, selecting "Remove All Overlays".
If you want to bring the default preset for a Scene back, highlight it and then Right-Click, selecting "Reset to Default".
Stream Command Scenes Only Appear Sometimes
The Scenes you make for use with Stream Command will appear to viewers of your stream.
They will not appear in any recordings or shared files you make from that stream.
Scenes will appear in any screenshots you take of your stream.
To preview your Scenes, set the incoming video to Live. If you view video in the Flashback Recording buffer, then the Scenes will not be visible.
Saving Webcam Video Separately
If you create a Scene with Webcam (Facecam) video, and record it, you can later save that Webcam video as a separate video file.
To do this, Right-Click on the video timeline in the Edit section, and then select "Save Webcam Video Only".
You can also choose the "Export webcam to a separate video file" option in the Sharing section of the Preferences. Then, that process will happen each time you share a recording.
Special Shortcut Keys
Press numbers 1 through 9 on the keyboard to switch from one Scene to another.
Press the Esc key to leave the Edit Scenes mode.
Hold down the Shift key to freely resize your Scene elements without being constrained by the normal aspect ratio.