2. Getting Started with OBS Studio
3. Configuring your Game Capture 4K60 Pro MK.2
4. High Dynamic Range (HDR) Content
In this guide we’ll show you how to use your Elgato Game Capture 4K60 Pro MK.2 with OBS Studio and configure the software to get the most out of your device for recording or streaming. While this guide is written for OBS Studio, many of the steps are the same for Streamlabs OBS.
What is OBS Studio?
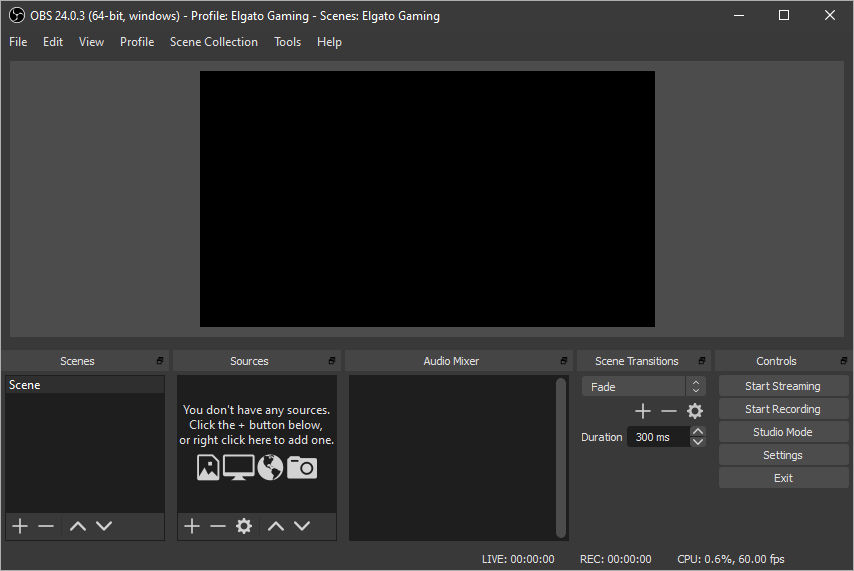
OBS Studio is a free and open source streaming and recording tool with powerful overlay systems and audio controls. It can stream to TwitchTV, YouTube, Mixer, Facebook, Twitter, RestreamIO, and more. It also can record and stream at the same time at different quality settings if desired.
You can download the latest version of OBS Studio here: https://obsproject.com/download
Current release as of this guide: 24.0.3
If you're interested in learning more about OBS Studio and what it can do, here is a OBS Studio Learning Course by EposVox: OBS Studio Master Class
Getting Started With OBS Studio
Once you have OBS Studio installed and open, go to the bottom half of the OBS Studio window. You should find a column on the left called Scenes and next to it a column called Sources. Below the Sources column, click on the + button below. Then choose Video Capture Device.
A new small window will appear asking what you wish to name the layer. You are free to name it whatever you wish, but for this guide we will call it 'Game Capture 4K60 Pro MK.2 Video'. Click on OK.
A new larger window with a preview will appear (seen below). This is asking you to choose the capture device from a list and to configure it. On the Device selection, choose “Game Capture 4K60 Pro MK.2 Video”.
High Dynamic Range (HDR) Content
If you are capturing an HDR source, the Elgato Game Capture 4K60 Pro MK.2 will convert the signal automatically to SDR in order to be compatible with OBS Studio. This is known as Tonemapping.
The result is that the image in OBS Studio will look different than how it will look on the HDR display you have connected to the passthrough. But this is normal behavior.
For the HDR to SDR tonemapping to work properly, 4K Capture Utility needs to be closed. When 4K Capture Utility is open, the device will switch to sending HDR video to your computer and video inside of OBS Studio will look washed out again.
Recording HDR While Streaming
If you wish to record HDR content inside of 4K Capture Utility while streaming SDR to your viewers, you will need to use the Stream Link feature.
See here for more information and instructions: Elgato 4K Capture Utility - How to use Stream Link
This is because the Game Capture 4K60 Pro MK.2 needs to turn off hardware tonemapping to send full HDR video into your computer for 4K Capture Utility to record it in HDR. When this happens, video coming from the Game Capture 4K60 Pro MK.2 inside of OBS Studio will become washed out.
To regain the proper looking video, 4K Capture Utility will tonemap the HDR content to SDR and send a copy into OBS Studio. In this setup, OBS Studio is not directly capturing content from the Game Capture 4K60 Pro MK.2.
Configuring your Elgato Game Capture 4K60 Pro MK.2
Properties
Below the device selection and preview, you have a set of properties you can change.
Deactivate/Activate
This function is for essentially turning off the device from OBS Studio or turning it on. This can be helpful if you’re experiencing issues as a way to soft reset the device. More information in #Troubleshooting.
Configure Video
The Configure Video function with the Elgato Game Capture 4K60 Pro MK.2 is used for viewing the signal information the card is receiving. Sometimes your PC may be sending a different signal than you may expect. As a result, this is useful if you're trouble shooting the signal type that is coming from your PC, Console, or other source. Also a great way to see the driver information.
Configure Crossbar
This button is currently unused with our devices.
Resolution/FPS Type
This is used to switch between automatic or custom resolutions and framerates. You can usually leave this on Device Default. More information in #Troubleshooting.
Color Space
You can leave this on Default.
Color Range
Full and Partial refer to how expanded the range is. Having this incorrectly set could cause your video to appear overly contrasted or faded. If you’re capturing video from a PC, this may need to be set to Full. If you’re capturing from a console, generally Default or Partial is recommended.
Buffering
Leave Buffering set to Disable.
Audio Output Mode
We’d generally recommend setting this to Capture audio only. If you wish to listen to audio coming from the Elgato Game Capture 4K60 Pro MK.2, we’d suggest using OBS Studio’s Audio Monitoring feature.
However, you can use the options Output Desktop Audio (Wave Out) or Output Desktop Audio (DirectSound) to do this as well. Keep in mind that the audio your viewers hear will be coming from your Desktop Audio track now.
Custom Audio Device / Setting Up Chat Link
To use the Chat Link inside of OBS Studio with your Elgato Game Capture 4K60 Pro MK.2, right click on your Elgato Game Capture 4K60 Pro MK.2 layer and go to Properties. Then enable 'Custom Audio Device'. A new dropdown menu will appear below.
If you've connected your Chat Link to a Microphone or Line Input on your computer, it would be listed in this menu. Typically this will be Integrated audio and may be listed as 'Line In (High Definition Audio Device)'
This will allow OBS Studio to override the onboard audio input of the Elgato Game Capture 4K60 Pro MK.2 and instead use your Line In connection.
For more information on the Chat Link and how it works, please see our Chat Link User's Guide.
Adjusting The Scene
OBS Studio’s preview represents what the viewer sees. This is called the Canvas and you’re able to move, rotate, scale, crop, and stretch different objects in the scene. This area is also able to be changed live while recording or streaming. You are able to add or remove objects as well as move or scale them while you are recording or streaming and those changes will be in your recorded file or show up for your stream viewers.
Transform
Move
To move an object around in your scene, you can hover over it in the preview or select it in your Sources list. Then drag it around in the preview.
Scale
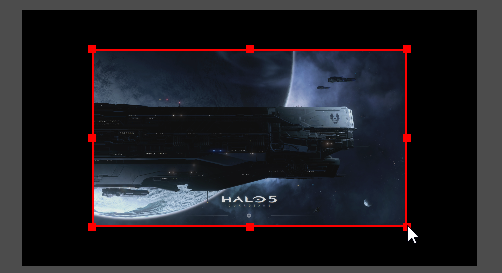
If you didn’t wish for your Elgato Game Capture 4K60 Pro MK.2 to take up the whole screen, you can grab one corner and drag in towards the center to make it smaller. This is helpful for adding borders or overlays to the side and not covering the gameplay.
Crop
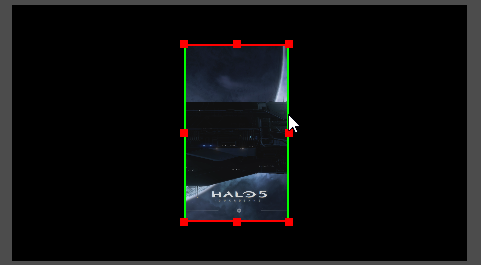
If you’re capturing from an older console which is outputting a 4:3 or non-widescreen signal, you can hold the ALT key and drag in a side to crop the video from the Elgato Game Capture 4K60 Pro MK.2. You will see a green border where a crop as occurred.
For more advanced controls, you can right click on your Elgato Game Capture 4K60 Pro MK.2 source, then go to Transform, Edit Transform. This is useful for typing in specific values for accuracy.
Layer Order
If you plan to have overlays or other layers in your scene with the video from your Elgato Game Capture 4K60 Pro MK.2, you will need to ensure those overlays are on top of your Elgato Game Capture 4K60 Pro MK.2 layer.
Like Photoshop or other image editors, layers on the bottom of your sources list are in the background and layers on the top of the list are in the foreground.
OBS Studio General Settings
For a head start in setting up OBS Studio, you may want to try the Auto-Configuration Wizard. This Wizard can be found under the Tools menu.
This wizard will setup OBS Studio based on various details about your computer, such as monitor resolution, performance of your system, and internet speed. It’s a good option for getting started.
There is a lot of options inside of OBS Studio, but not all apply to the basics of using your Elgato Game Capture 4K60 Pro MK.2. So we will focus on the basics. Firstly, we need to make sure the software will be operating at the right resolution and framerate.
Video
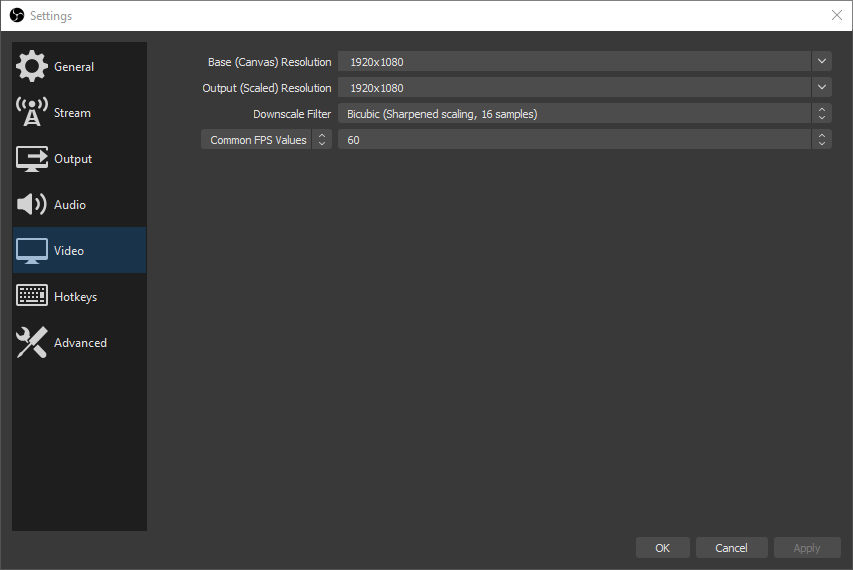
We can do this by going into File > Settings. Then go into the Video tab. If the Auto-Configuration Wizard hasn’t yet changed this, you will typically want to set your Base (Canvas) Resolution to 1920x1080. This is the resolution of your Canvas or the work area with you layers and overlays.
The next option for Output (Scaled) Resolution is what is ultimately recorded to your computer’s disk or sent to the streaming service. If you’re on a slower internet connection or a weaker computer, you can lower the Output (Scaled) Resolution to 1280x720 for example.
If you're capturing a console running in 4K, and plan to record video, then you may wish to set your canvas to 3840x2160 rather than 1920x1080 and then use Output (Scaled) Resolution to dictate what is recorded or sent to stream.
Next, you will want to choose the framerate or FPS of your stream or recording. Typically you will want to have this set to 60.
Audio
General
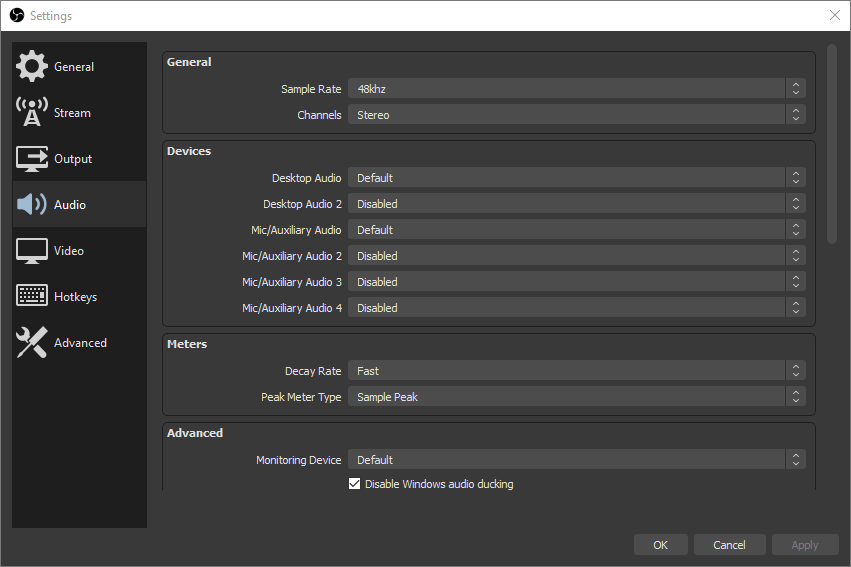
Inside of the Audio menu inside of Settings, we will want to be sure that Sample Rate is set to 48Khz. Our Elgato Game Capture devices natively operate at 48Khz. Setting this to 44.1Khz can cause audio stutter, audio drifting over time, or other anomalies.
Our devices capture audio in Stereo and do not support surround sound. Set Channels to Stereo.
Devices
In the Devices section we're able to assign additional audio sources to be used in your stream or recording.
Desktop Audio refers to the sound that comes out of your system. Default will attempt to use the same device as you have set for your computer. But if you have a specific setup which you don't wish to have change, you can specify a specific device.
Mic/Auxiliary Audio is for adding additional audio input sources. These could be USB microphones, Line-In inputs, or other inputs from mixing boards.
Advanced
If you wish to hear audio from your card or other hardware inputs, be sure to select the device where you'd want to hear this audio. Generally this would be the same device as Desktop Audio.
Output
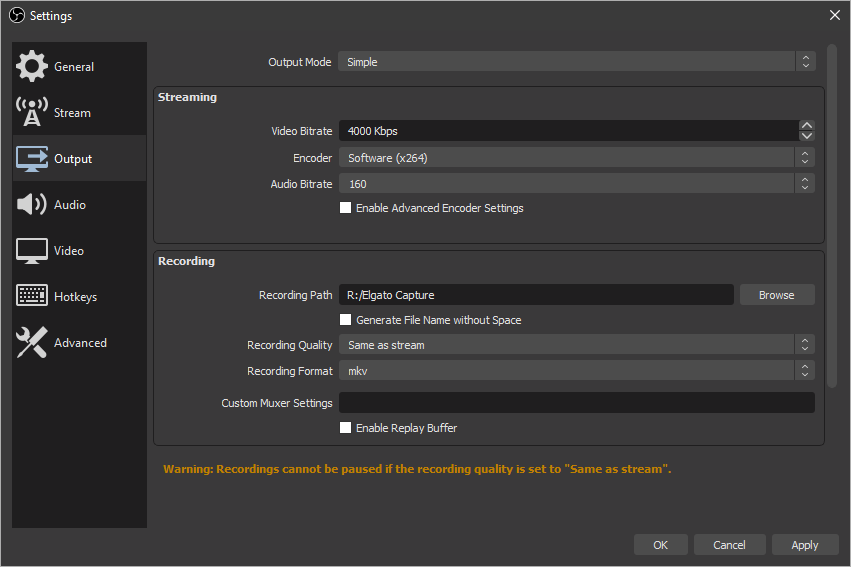
The Output tab is where we control the type of file we output, how big of the file will be, and where it is saved. Leaving the Output Mode set to Simple is recommended for starting out.
Video Bitrate
If you are using OBS Studio primarily to stream, the you will wish to set Video Bitrate to a level well within your Internet's upload speed. A good rule to follow is setting this to 80% of your upload. If you had 5000Kbps or 5Mbps as your upload speed, then setting this value to 4000Kbps would be a good starting point.
Encoder
The Encoder option refers to which part of your system will be doing the work of compressing your video for streaming or recording.
Software (x264) will use your systems' processor and generally will have a larger impact on computer performance but may result in higher quality.
Hardware (NVENC) will use your system's Nvidia Video Card and will generally have a smaller impact on computer performance but may result in lower quality.
Audio Bitrate
This controls the bitrate and therefore quality of the audio of your stream. Between 128Kbps to 160Kbps is a good place to start.
Troubleshooting
No Signal
Close OBS Studio and open our 4K Capture Utility software to see if a signal comes through. If no signal is appearing, you will need to do some general troubleshooting. Look to see if any video is appearing on your TV or Monitor connected to the HDMI Passthrough port. Ensure that HDCP Encryption is disabled on your Game Console or other source device.
If you see video in 4K Capture Utility, then your device is working properly. Close 4K Capture Utility. Then inside of OBS Studio, right click on your Elgato Game Capture 4K60 Pro MK.2 layer and go to Properties. Then click on Deactivate. Wait 10 seconds and Click on Activate. If this doesn't help then close Properties. Right click on your layer again and go to remove. Try remaking the Video Capture Device as seen in 2. Getting Started with OBS Studio
Video isn’t the right size
If you’re noticing that the video from your Elgato Game Capture 4K60 Pro MK.2 isn’t filling your scene or it’s shaped oddly, try right clicking on the Game Capture 4K60 Pro MK.2 layer in your source list, then go to Transform, and Reset Transform or Stretch to Screen.
Video looks lower quality
Your Elgato Game Capture 4K60 Pro MK.2 may be operating at a lower resolution. Right click on your Elgato Game Capture 4K60 Pro MK.2 layer and go to Properties. Then look for Resolution/FPS Type. Set this from Device Default to Custom.
Go to the next option on the list Resolution. Select the resolution of your source, this may be 3840x2160 for 4K UHD, 1920x1080 for 1080p, or 1280x720 for 720p.
The next option, FPS, can be set to Highest FPS.
Video Format can be set to Default, YV12, or NV12.
My Chat Link audio isn't working
OBS Studio doesn't use the same audio settings for your Elgato Game Capture 4K60 Pro MK.2 as you may have set in your 4K Capture Utility software.
Make sure you follow our instructions in Chat Link Setup